How to Measure a Garage Door Opening and Clearances
Quick answer
Measure the finished opening, then record left and right sideroom, headroom and backroom separately. Note obstructions and take labeled photographs. These measurements help plan a replacement; they do not establish the final door, spring, track or opener specification.
Record the actual numbers without rounding to a standard size. The installer can decide what they mean for the proposed system. Do not remove trim or hardware to make an opening match a catalog size.
Before measuring
Identify what the measurement is for: a complete replacement, a quote, insulation, a bottom seal or a replacement section. Each needs different dimensions. A door-opening measurement does not identify a compatible replacement panel or track.
Amarr’s measuring guide presents these as initial measurements for a cost estimate. Clopay’s guide distinguishes opening size, each side clearance, headroom and depth. Its clearance examples differ by spring system; they are not universal minimums for every installation.
Safe access only: Do not stand beneath an unsafe or unsupported door, climb on tracks or pull an emergency release to make measurement easier. If a needed dimension is inaccessible, mark it “installer to verify.”
Tools and time
Use a tape measure, pencil, paper, camera and a helper where needed. A suitable laser measuring tool may help with some clearances if used according to its instructions; do not point it toward eyes. Allow 20–40 minutes as an editorial planning estimate for an accessible survey, excluding any work at height.
Use one unit consistently and label it. If you also provide a conversion, retain the original measurement. Write fractions clearly; “7 feet, 1 inch” is less ambiguous than an unlabeled “7.1.”
Step-by-step measurement record
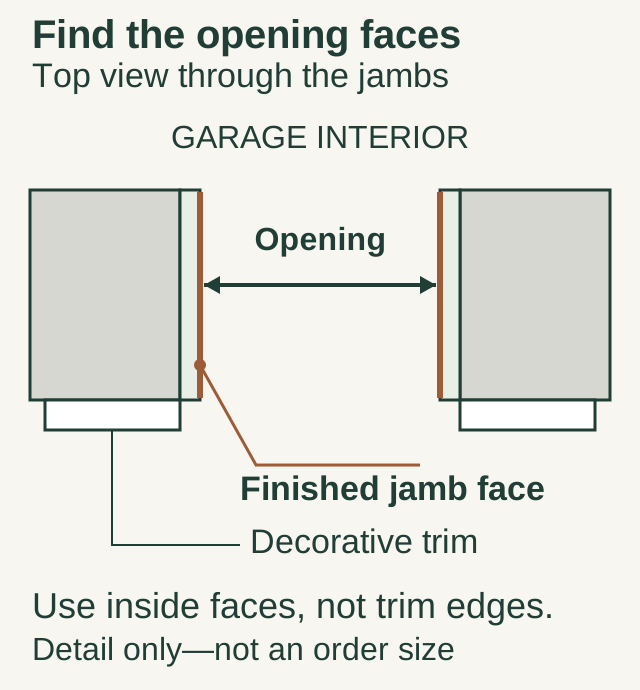
Scroll within the image if needed, or open the full-size view. The key details are also written below.
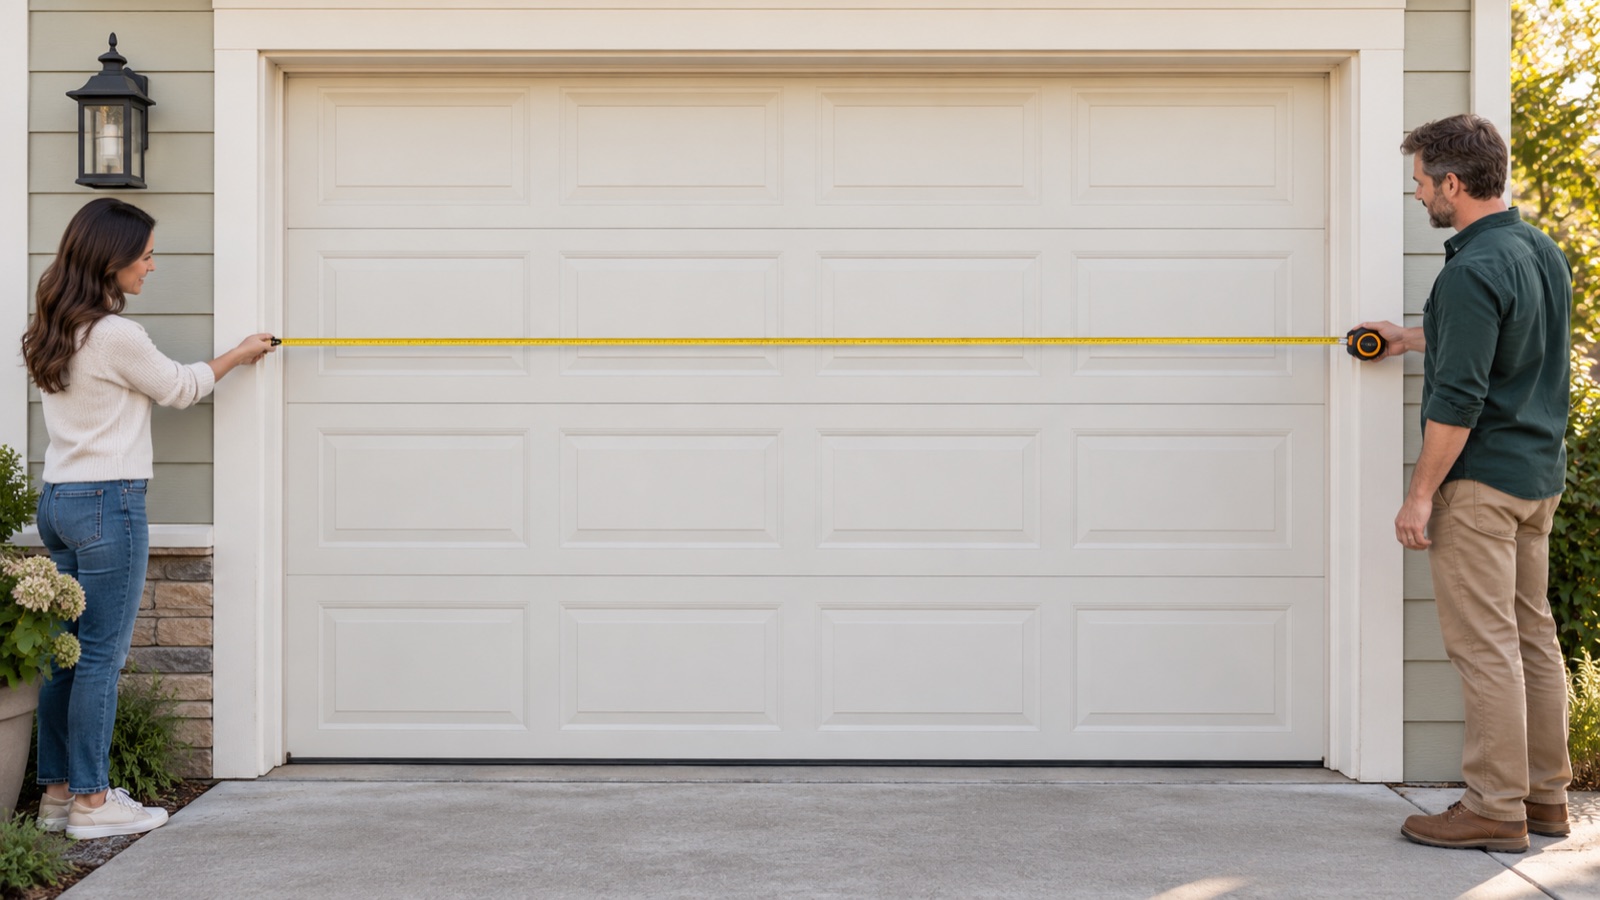
The opening width runs from one finished inside face to the other, not between the outer edges of decorative trim. Record actual readings and let the installer confirm final ordering dimensions.
Where each measurement begins and ends
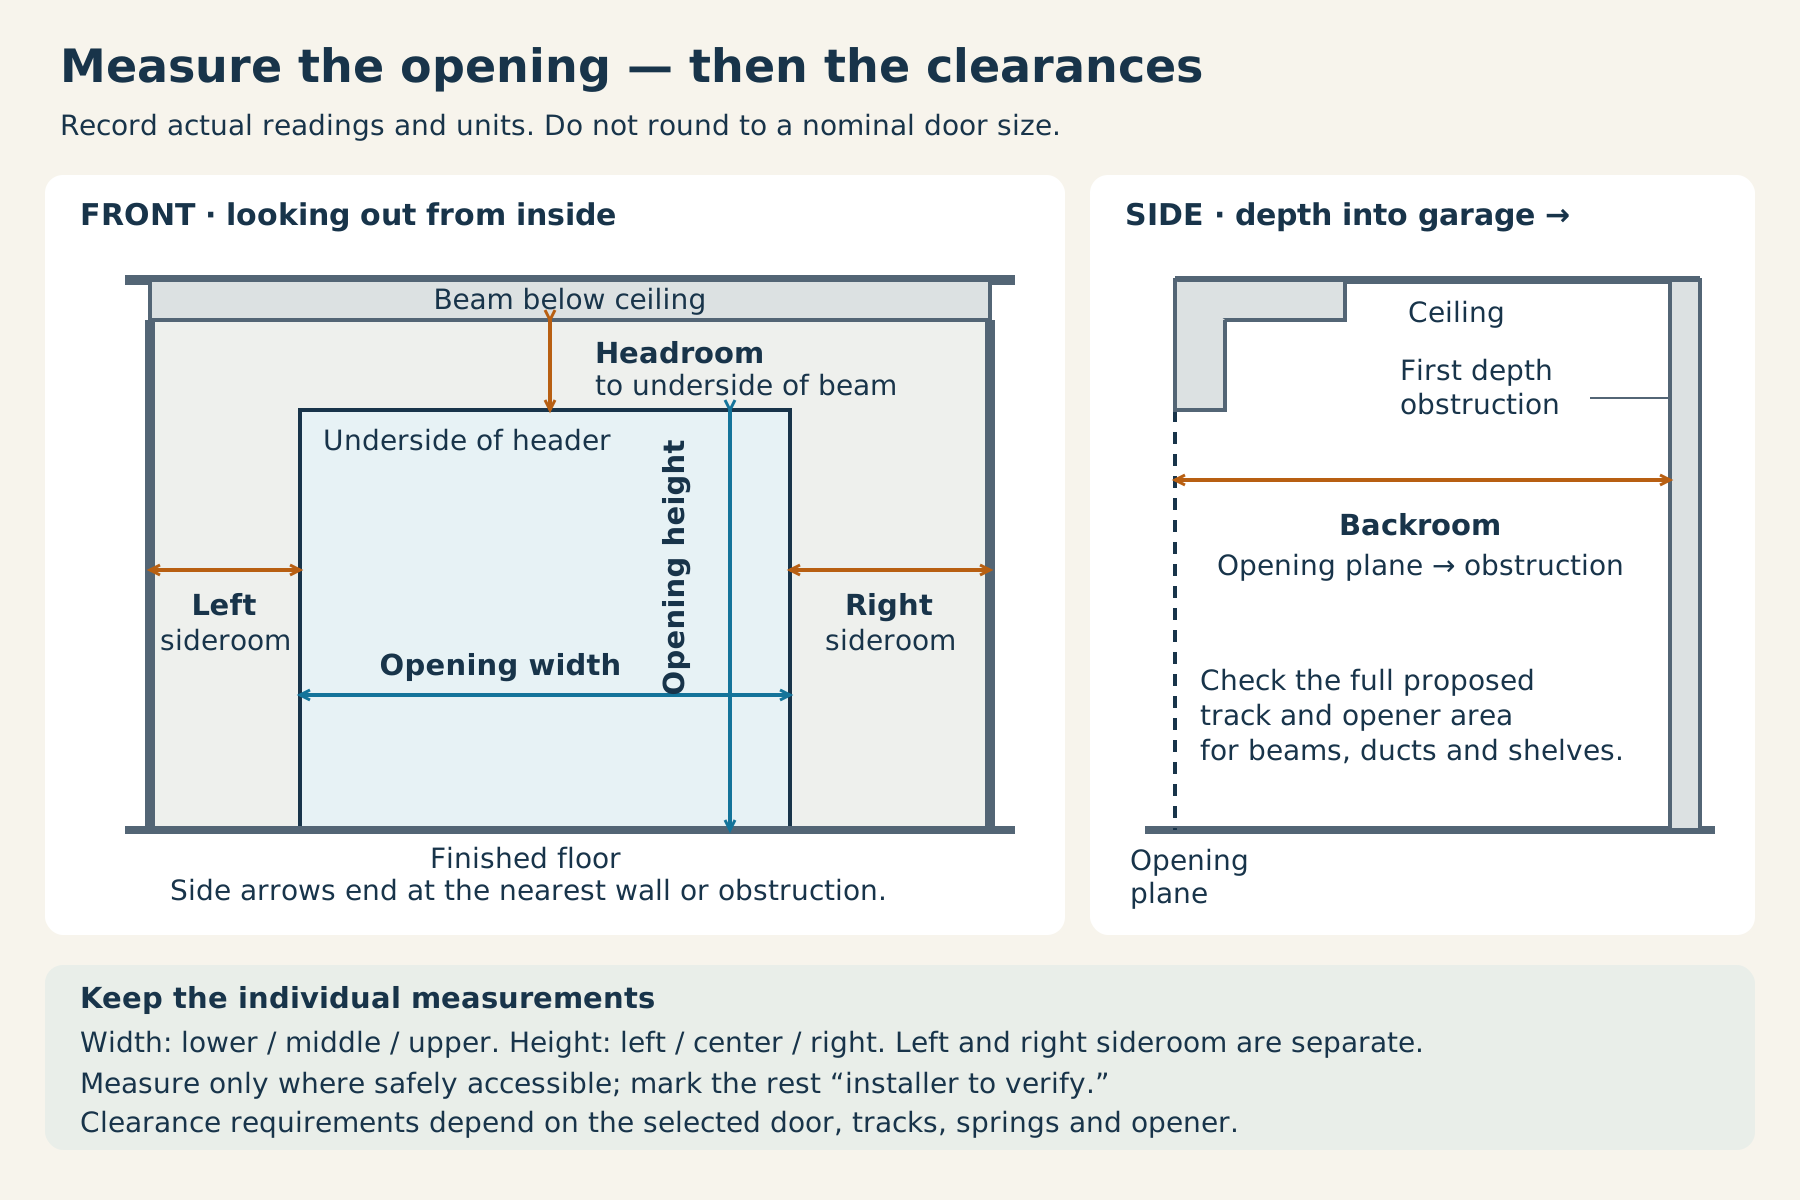
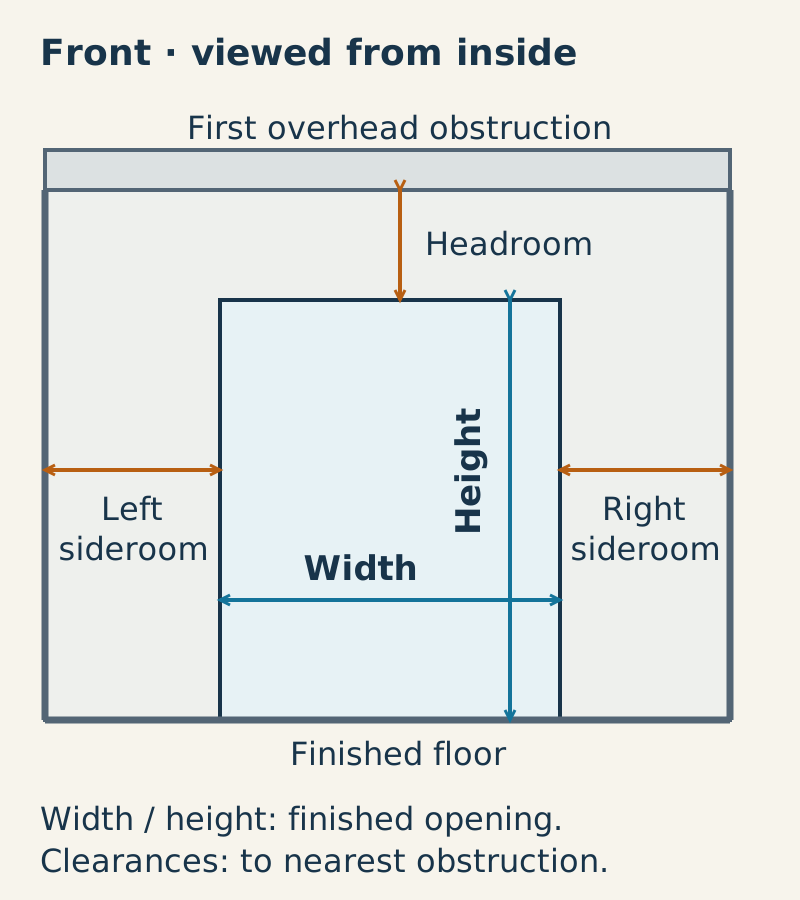
- Width: between the finished side faces. Record lower, middle and upper readings where safely accessible.
- Height: from the finished floor to the underside of the header. Record left, center and right readings where safe.
- Sideroom: measure each side separately, from the opening edge to the nearest wall or obstruction.
- Headroom: from the top of the opening to the first limiting overhead feature, such as the underside of a beam below the ceiling.
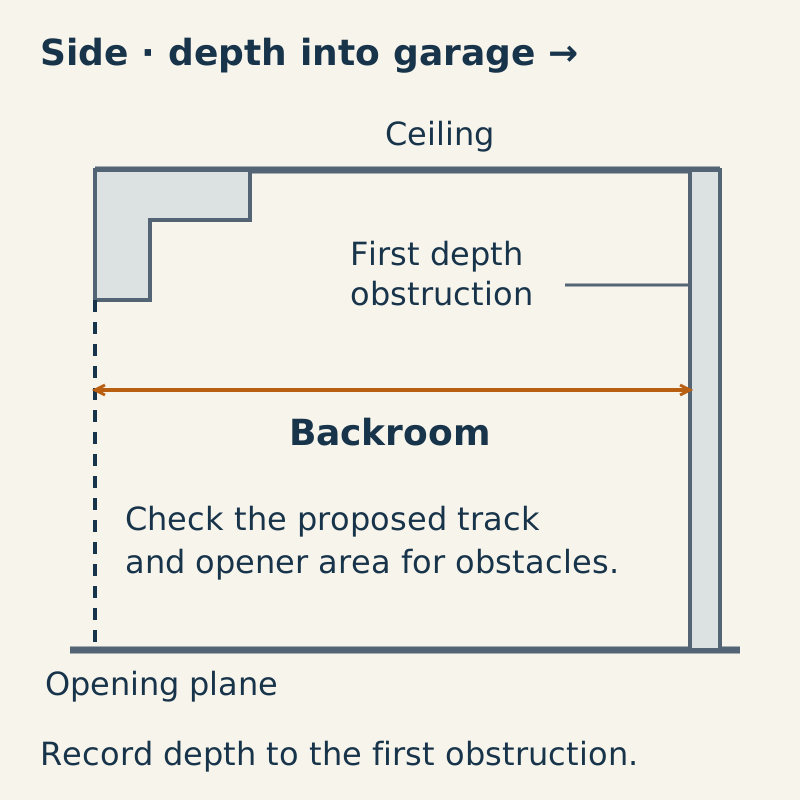
- Backroom: depth from the opening plane to the first relevant obstruction. Check the full proposed track and opener area for beams, ducts and shelves.
Keep the actual readings and units; do not round to a nominal door size. Mark inaccessible points “installer to verify.” This is a preliminary survey, not approval to order: required clearances depend on the selected door, tracks, springs and opener.
Amarr: measuring the opening and clearances.
- Label the viewpoint and opening. Sketch the door from inside the garage and identify the left/right sides. If there are multiple doors, assign each a name. Expected result: photographs and numbers refer to the same opening rather than a mixture of two similar bays.
- Measure finished opening width. Measure between the finished side faces at accessible lower, middle and upper positions where safe. Do not substitute the outside width of decorative trim or the width of a door panel. Expected result: three labeled readings that reveal variation. If the upper point needs unsafe access, record the available readings and the missing one.
- Measure finished opening height. Measure from the finished floor to the underside of the header at left, center and right where accessible. Expected result: actual opening heights, including any floor variation. Do not average them into a single convenient number without preserving the originals.
- Record each sideroom separately. Measure from each side of the opening to the nearest relevant wall or obstruction inside the garage. Include columns, pipes, electrical equipment or shelving that may limit installation. Expected result: distinct left and right clearances, not an assumption of symmetry.
- Record headroom and obstructions. Measure or document the space above the opening to the nearest limiting ceiling feature. Identify beams, pipes, ducts and existing opener equipment. Expected result: a clear description of what limits space; a high ceiling farther back does not remove an obstruction immediately over the opening.
- Record backroom. Document available depth inward from the opening and any obstruction along the proposed track/opener area. Expected result: a usable depth record with ceiling features noted. Do not crawl over a raised door or storage platform to obtain it.
- Photograph the full installation. From safe positions, capture the interior opening, overhead area, each side and the exterior approach. Include readable model labels only when reachable. Expected result: context for a quote, not close-ups that hide the surrounding clearance problem.
- Have the proposed system verified. Give the installer all readings and mark which were estimated or inaccessible. Expected result: a final site measurement and compatible door/track/opener specification before ordering. Do not order springs or reuse tracks based only on this survey.
A useful worksheet
Record: opening name; date; units; width at three heights; height at three positions; left sideroom; right sideroom; limiting headroom feature; backroom; floor slope observations; model label; and any inaccessible area.
Add changes that are planned but not yet built, such as a finished ceiling or floor coating. Proposed dimensions belong in a separate column from current dimensions. Otherwise, a quote can accidentally combine today's opening with tomorrow's clearance.
Practical tip: Put a small numbered label on the sketch and use that number in each photograph filename. “Photo 4: pipe above right track” is clearer than a folder of unlabeled close-ups.
Common mistakes and limits
Do not assume nominal door size equals every visible panel dimension. Do not treat a low-headroom hardware example as proof it will fit around your beams. Final requirements depend on the full system, not just width and height.
Do not infer track reuse or replacement-section compatibility from opening measurements. Clopay’s installation guidance describes replacement track and hardware as matched to the new door. Have the installer specify the complete proposed system.
Common questions
Can we measure with the existing door closed?
Some dimensions and photographs are possible from safe positions, but the panel may obstruct others. Do not move an unsafe door to complete the worksheet.
Should we round to the nearest standard size?
For this worksheet, keep every actual reading rather than rounding it away. This is an editorial recordkeeping choice, not a substitute for the manufacturer’s ordering method. Supply the readings and let the installer determine the appropriate product.
Are these measurements enough to order?
They are preliminary planning information. Final fitting and system selection need verification for the actual opening and proposed equipment.
Copy this survey record
Use “not measured” for inaccessible dimensions; never enter zero for a measurement you could not take. The following is a record of observations, not an order form.
| Field | Your record |
|---|---|
| Opening name and date | ________________ |
| Unit used | ________________ |
| Width lower / middle / upper | ________________ |
| Height left / center / right | ________________ |
| Left sideroom / right sideroom | ________________ |
| Headroom and limiting obstruction | ________________ |
| Backroom and limiting obstruction | ________________ |
| Existing door / opener model if accessible | ________________ |
| Estimated or inaccessible measurements | ________________ |
| Planned floor / ceiling changes | ________________ |
| Photo numbers and notes | ________________ |
| Installer verification date | ________________ |
Manufacturer references
- Amarr initial opening measurements
- Clopay opening measurement and system clearances
- Clopay definitions of headroom sideroom and backroom
Was this guide useful?
Your choice stays in this browser only. It is not sent to us.
Sources & manuals3
Manufacturer instructions and references for this guide. Match the document to your exact product.
- Amarr’s measuring guide · Amarr: measuring the opening and clearances · Amarr initial opening measurementswww.amarr.com
- Clopay’s guide · Clopay’s installation guidance · Clopay opening measurement and system clearanceswww.clopaydoor.com
- Clopay definitions of headroom sideroom and backroomwww.clopaydoor.com